Discover the Secret to Year-Round Snickerdoodle Bliss: Homemade Energy Bars
Are you a fan of that warm, comforting snickerdoodle flavor but find yourself wishing it wasn't just a seasonal treat or a sugary indulgence? Imagine having that delightful cinnamon-sugar taste packed into a healthy, satisfying snack that you can enjoy any day, anywhere. While store-bought energy bars offer convenience, especially on a spontaneous road trip or a busy workday, they often come with a hefty price tag, limited availability, and sometimes, a less-than-ideal ingredient list. The good news? Crafting your own snickerdoodle energy bars at home is incredibly simple, vastly more affordable, and — let's be honest — tastes a thousand times better! This article will guide you through creating wholesome, delicious snickerdoodle energy bars that capture the essence of your favorite cookie without the guilt. Say goodbye to hunting for seasonal flavors or compromising on ingredients. With a few simple steps and natural components, you'll unlock a world of healthy, customizable snacking that fuels your body and delights your taste buds.Why Homemade Snickerdoodle Energy Bars Trump Store-Bought
The allure of a quick, pre-packaged snack is undeniable. However, when it comes to quality, cost, and customization, homemade always wins, particularly with something as specific and satisfying as snickerdoodle energy bars. Cost-Effectiveness You Can Taste: Think about the last time you bought a box of premium energy bars. The cost can quickly add up, especially if they’re a regular part of your diet. By making your own, you leverage bulk pricing for ingredients and eliminate the overhead of branding, packaging, and marketing. This means significantly more bang for your buck, allowing you to enjoy these delightful bars much more frequently without breaking the bank. For a deeper dive into the financial benefits, check out our related article: DIY Snickerdoodle Energy Bars: Cheaper & Tastier Homemade. Unmatched Customization and Freshness: One of the biggest advantages of DIY snacks is the ability to tailor them precisely to your preferences and dietary needs.- Allergy Considerations: If you or a loved one has nut allergies, you can easily substitute almonds and cashews with seeds like sunflower or pumpkin seeds, or even a mix of seeds and oats.
- Flavor Control: Remember that overwhelming cinnamon taste in some store-bought versions? With homemade bars, you're the master chef. Start with a moderate amount of cinnamon and taste as you go, adding more if you desire a bolder spice profile.
- Texture Perfection: Do you prefer a smooth, cookie-dough-like consistency or do you love a satisfying crunch from larger nut pieces? You decide how long to process your ingredients, giving you complete control over the final texture.
- Nutrient Boosts: Want to add a spoonful of flax seeds for omega-3s, chia seeds for extra fiber, or even a scoop of your favorite protein powder? The options are limitless.
The Core Recipe: Simple Steps to Delicious Snickerdoodle Energy Bars
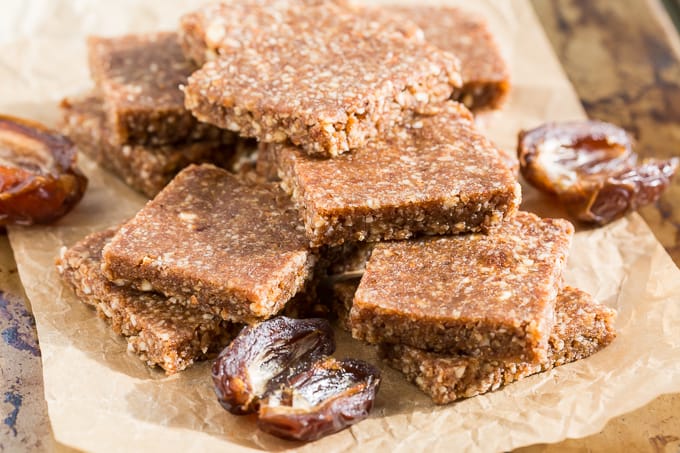
Creating these energy bars is remarkably straightforward, requiring minimal equipment and just a few wholesome ingredients. The process is so simple, you'll wonder why you ever bought them from a store! Yields: 12-14 bars Prep time: 15 minutes Chill time: 1 hourIngredients: Making Your Bars Shine
To achieve that perfect snickerdoodle flavor and satisfying texture, here’s what you’ll need:- 2 cups Medjool dates, pitted: Medjool dates are the star here. Their natural caramel-like sweetness provides the perfect binder and a wonderful base flavor. Ensure they are soft and moist; if they seem dry, soak them in warm water for 10-15 minutes and drain well before using.
- 1 cup whole raw cashews: Cashews contribute a creamy texture and mild, buttery flavor.
- 1 cup whole raw almonds: Almonds add a subtle crunch and nutty depth.
- 2 tsp ground cinnamon: The essential spice for that signature snickerdoodle profile.
- 2 tsp vanilla extract: Enhances the sweetness and rounds out the flavor.
- Pinch of salt (optional, but recommended): A tiny pinch of sea salt balances the sweetness and makes all the flavors pop.
Directions: Crafting Your Snickerdoodle Energy Bars
Follow these easy steps to bring your healthy snack dreams to life:- Prepare the Date Paste: Add the pitted Medjool dates to a high-speed food processor. Process until they break down and form a thick, sticky fruit paste. This might take a few minutes, scraping down the sides as needed. Remove the paste and set it aside in a separate mixing bowl.
- Process the Nuts: Now, add the whole raw almonds and cashews to the food processor. Process until they are finely chopped, but *not* to a powder. You're aiming for a texture that's fine enough to blend well but still offers a slight crunch. If you prefer a smoother bar, process them a bit longer. If you like more substantial chunks, pulse them less.
- Combine All Ingredients: Add the processed nuts, ground cinnamon, vanilla extract, and the optional pinch of salt to the bowl with the date paste. Mix all the ingredients together thoroughly. You can use a sturdy spoon or even your hands (which can be very effective for incorporating the sticky date paste) until everything is well combined and forms a uniform "dough."
- Shape the Bars: Line a baking dish (a standard 8x8 or 9x9 inch pan works well) with parchment paper or plastic wrap, leaving an overhang on the sides for easy lifting. Press the energy bar mixture firmly and evenly into the lined dish. Use your fingers or the back of a spoon to smooth out the surface and ensure a consistent thickness, aiming for about ½ inch thick. This recipe comfortably fills about ¾ of a standard baking sheet if you opt for a thinner bar.
- Chill and Cut: Cover the dish and refrigerate for at least 1 hour. Chilling helps the bars firm up, making them easier to cut cleanly. Once firm, lift the slab out of the dish using the parchment paper overhang. Place it on a cutting board and use a large, sharp chef’s knife to cut it into 12-14 bars (or roll them into balls for a bite-sized treat).
- Store: Store your homemade snickerdoodle energy bars in an airtight container in the refrigerator for up to one week. For longer storage, they can be frozen for up to one month.
Tips for Perfect Snickerdoodle Energy Bars Every Time
- Achieving Your Desired Texture: As mentioned, the processing time for your nuts is crucial. For a soft, cookie-dough like bar with a few delightful chunks, process the nuts until they're finely chopped but not completely pulverized. For a smoother bar, process them until they resemble coarse flour before combining.
- Don't Skip the Chilling: While tempting to dive right in, allowing the bars to chill for at least an hour makes a world of difference. It helps the fats in the nuts solidify and the dates bind everything together, resulting in clean cuts and a much less sticky experience.
- Lining the Dish is Your Friend: Always line your baking dish with parchment paper or plastic wrap. This prevents sticking and allows you to easily lift the entire slab of mixture out for cutting, making the process much tidier and simpler.
- Adjusting Sweetness and Spice: Taste the mixture before pressing it into the dish. If you crave more cinnamon, add another half teaspoon. If your dates aren't super sweet, a tiny drizzle of maple syrup or honey can boost the flavor (though usually unnecessary with Medjool dates).
- Allergy Alert: A quick reminder that this recipe includes tree nuts. If you have nut allergies in your household, consider substituting with seeds (like sunflower, pumpkin, or hemp seeds) or a combination of oats and seeds. Always be cautious and mindful of specific allergies.
- Batch Size & Freezing: This recipe makes a decent batch for the week. If you want to make a larger quantity for meal prep, simply double the ingredients and use a larger dish. These bars freeze beautifully, so feel free to make extra and pull them out as needed for a quick, healthy snack.
Beyond the Recipe: The Health Benefits of Your Homemade Snack
These snickerdoodle energy bars aren't just delicious; they're a powerhouse of nutrition designed to keep you energized and satisfied.At their core, these bars are packed with whole, unprocessed ingredients. Medjool dates provide natural sugars for quick energy, coupled with a significant amount of fiber, which helps regulate blood sugar levels and promotes satiety. The combination of cashews and almonds delivers healthy monounsaturated and polyunsaturated fats, essential vitamins (like Vitamin E), minerals (magnesium, zinc), and plant-based protein. This balanced macronutrient profile means you get sustained energy release, avoiding the sugar crash often associated with highly processed snacks. The addition of cinnamon isn't just for flavor; this spice is known for its antioxidant properties and potential benefits for blood sugar management.
Choosing homemade means you're in control of every ingredient, eliminating artificial flavors, preservatives, and excessive added sugars found in many commercial alternatives. It's clean eating at its most delicious and convenient. These bars are perfect for a pre-workout boost, a mid-afternoon pick-me-up, or a healthy dessert that truly satisfies. They embody healthy snacking that is both practical and wonderfully indulgent.
